Installation and configuration on Windows computers
The procedures described below use Putty, Xming, and WinSCP for interacting with ukkepuk.
Installation via CDW
Go to the ‘Softwarewinkel’ (in Windows start menu)

and request(press aanvragen):
- Putty (SSH and telnet client) – used for connecting to ukkepuk
![]()
- Xming (X Window System Server) – used for graphic content

- WinSCP (SFTP client) – used for transferring files between CDW and ukkepuk
![]()
These are then installed in minutes.
Installation on other windows computers
- Download putty (http://www.putty.org/)
- Download and install Xming (https://sourceforge.net/projects/xming/)
- Download and install WinSCP (https://winscp.net/)
Configuration
- Start Xming (you should see the Xming icon in the icon bar).
- Start Putty.
- Configure Putty:
- Start Putty
- Fill in ‘ux-p-bicalc.amc.nl’ in the ‘Host Name’ box
- Fill in a name (e.g., ‘Ukkepuk’ in the ‘Saved Sessions’ box, and click ‘SAVE’.
- This will save your Putty configuration. The next time you start Putty you can ‘LOAD’ Ukkepuk, which will load your configuration.
- Click on ‘Window’ in the right menu, and change ‘Rows’ to 40.
- Click on ‘Colours’ and select ‘Default Foreground’. Set the Red, Green, and Blue values to 0.
- Click on ‘Colours’ and select ‘Default Background’. Set the Red, Green, and Blue values to 255.
- Click on ‘SSH’ in the right menu, and then on ‘X11’ in the right menu. Enable X11 forwarding.
- Click on ‘Session’ in the right menu and again press SAVE to save all your settings in Ukkepuk.
- Click ‘Open’. This will open a so-called Unix Terminal that allows to enter Unix commands.
- Provide your AUMC Username and Password
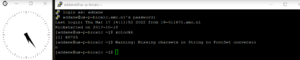
- Type ‘xclock &’. If you see a clock then everything is ok.
